This post may contain affiliate links. Please read our disclosure policy.
Whether you are celebrating your love of reading, sharing with a book-loving friend, making these gifts for book club, or even creating a custom book bauble decoration Ornament filled with your child’s favorite childhood books— it’s the perfect gift.
This miniature book ornament was created & shared by Sarah Gleaton Deaner. This post has affiliate links to the materials I suggest, a few options for creating the ornament, and suggestions by others who have made the ornament.
This is one of my favorite gift ideas! As you know, I love just about every custom & personalized gift because they are so meaningful. This one fits right in!
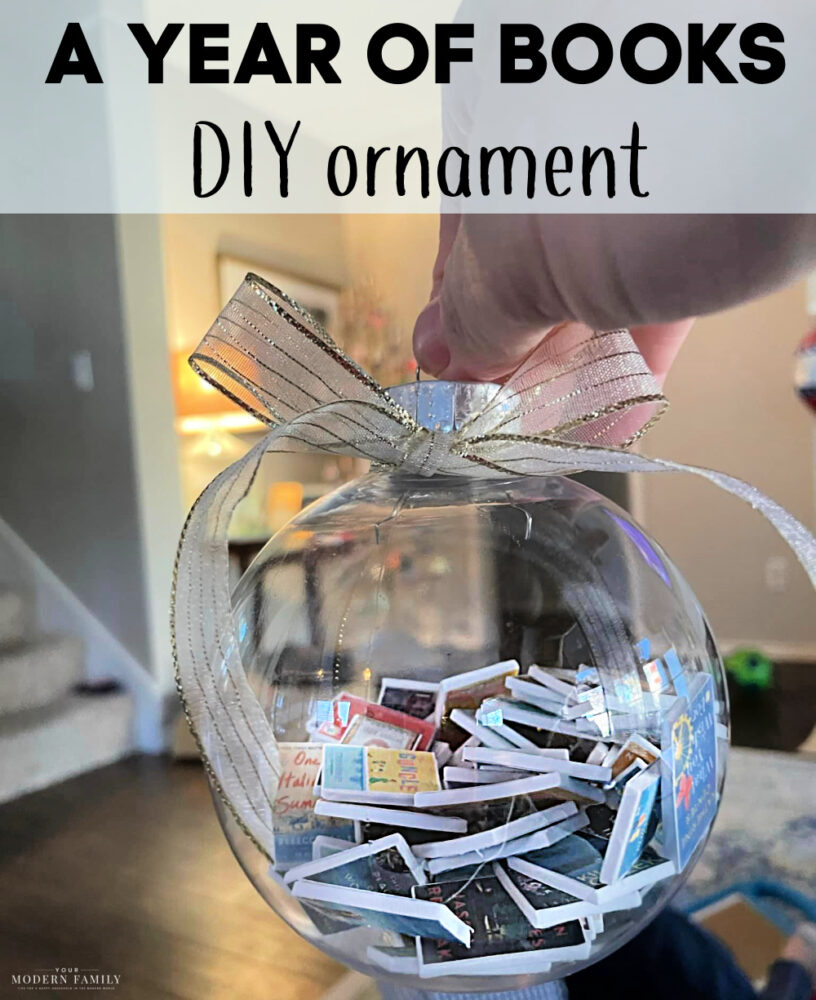
MINIATURE BOOKS ORNAMENT— A YEAR OF BOOKS
This DIY Year of Books Ornament is the most thoughtful, sweet, personal, caring, and creative gift. It’s also a labor of love because it can be a bit tedious, but trust us… it’s worth it! The result is amazing!
WHAT DO YOU NEED TO MAKE THE ORNAMENTS?
There are a few options, so pick the one that works best.
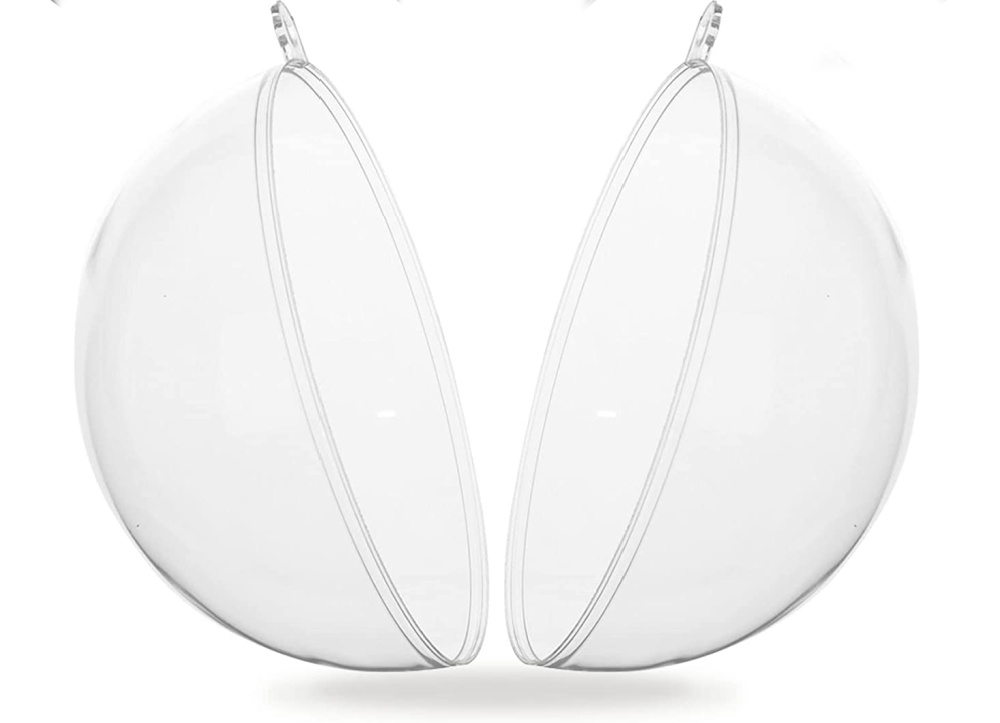
- 4” plastic ornament – These shatterproof ornament baubles open in the middle, so you won’t have to worry about your book size fitting in the top of the ornaments.
- 2mm Foam Sheets OR foam mounting tape (You can use two pieces per book.)
- Printable White Sticker Paper for Printing or regular (or cardstock) printing paper if using foam mounting tape.
THE QUICK DIRECTIONS FOR THE BOOKS ORNAMENT:
- To make these ornaments, you need to grab the image of your book and paste it into a Google Doc or Microsoft Word. Make them smaller.
- Next, copy & paste each picture because you need two of every picture (for the front & back).
- Get foam mounting tape and ornaments (you can find both at Dollar Tree). The mounting foam tape is the perfect size for books, and it’s double-sided, so it sandwiches the two book images to make a miniature book.
- Or – Instead of the foam mounting tape, you can get sticker paper & foam sheets if you’d rather make your books that way. I’ll explain both options below.
📚📖 KEEP READING BELOW for more detailed directions, a list of supplies, tips, and FAQs. 📖 📚
TIPS TO KEEP IN MIND BEFORE YOU BEGIN:
PRO TIP ONE— DOUBLE IT: You’ll need TWO identical pictures of each book cover (one for the front and one for the back), ensuring that it will be seen no matter how the miniature foam book turns or flips inside the ornament globe.
PRO TIP TWO— USE MY TEMPLATE: I have a Google Template for the Book Ornament. It will create the perfect-sized book covers for your ornament. You’re welcome to it (it’s free). Make a copy of the template before you begin (don’t worry- it will prompt you to do so when you open it.)
PRO TIP THREE— TEST IT FIRST: Before you spend time creating your book images (using this Template on Google Docs), I suggest printing out a blank copy of the template first, so you can test the size with your ornament.
Cut out just ONE rectangle and put it into your ornament globe without bending or folding it to ensure that it fits through the opening at the top of the ornament. After you print & cut one “book” and you’ve tested that it fits through the top of the ornament, you will know if you need to adjust the size. Hopefully, it’ll work, and you can start creating your book covers.
OR… get the ornaments that open in the middle like this one.
YEAR IN BOOKS ORNAMENT DIRECTIONS
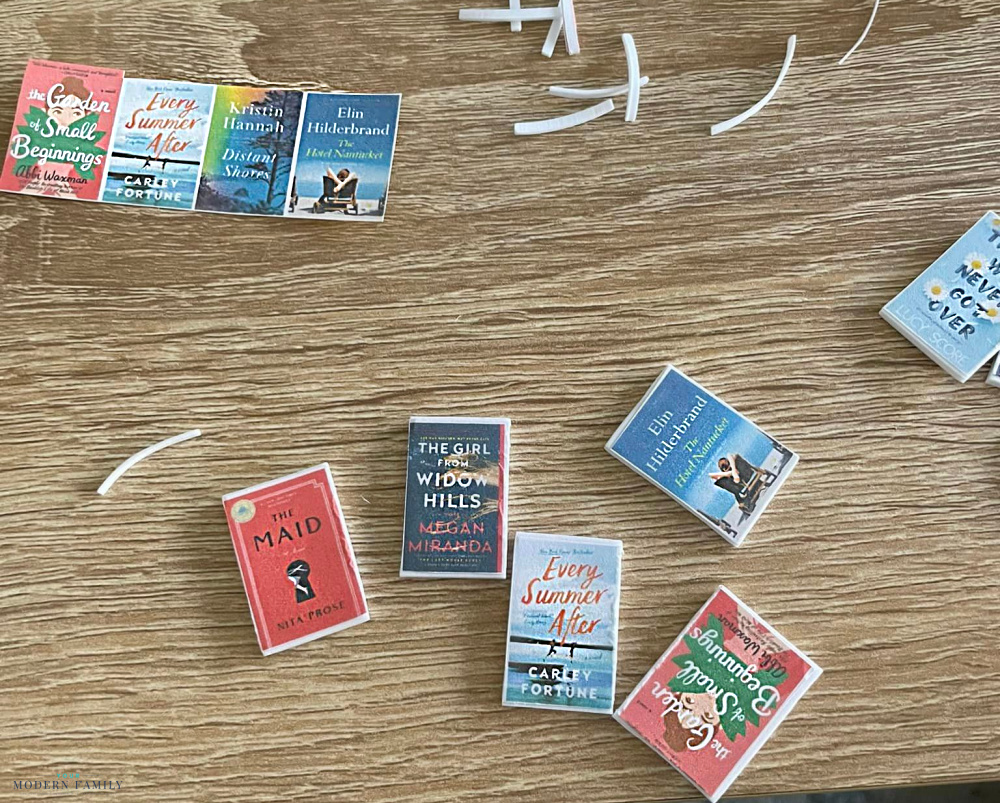
1- FIND THE COVER IMAGES:
First, make your list of books and begin pulling images to use. You can find images of your book on Amazon, an online book store, or Goodreads. If you have a Yearly Reading Challenge on Goodreads, that’ll be the most helpful— copy the thumbnail image so you won’t have to change the dimensions too much.
2- PASTE THE COVER IMAGES INTO THE TEMPLATE*
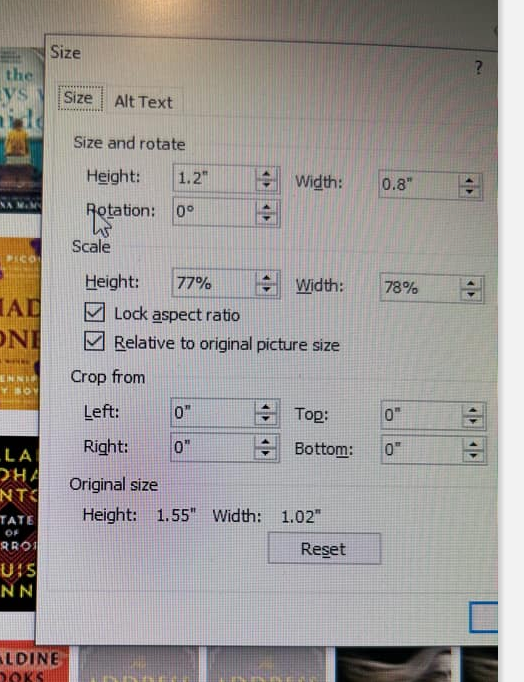
- Once you copy the book cover, you can paste it into a Word Doc, Excel, or Google Docs (you can use my Google template*). Size each image to 1.2 X 8.
- Copy it and paste that image into the second spot (since you need two pictures per book— one for the front & one for the back.)
3- PRINT:
When your template is filled up, and all of the book covers fit well, it’s time to print them onto STICKER PAPER if you are using foam sheets or onto REGULAR PAPER (or cardstock) if you are using foam mounting tape.
4- CUT
Cut the book pictures out using scissors, a paper slicer, or a guillotine paper cutter, keeping your duplicate covers together. (You can cut them apart before sticking them on your book. This will cut down on time searching for the matching cover later.)
5- FOAM:
Using thin foam is key to giving books structure. You have two options for foam:
Option One: Use foam mounting tape. Two pieces of mounting tape make the perfect size for each book.
Option Two: Use a 2mm foam board.

NOTE: If you’re using the foam paper/board instead of the foam mounting labels, use your guillotine paper cutter or scissors to cut each piece of foam to match the book cover size. Cutting the foam into 6/8″ x 1″ pieces worked best with my book covers.
If you adjusted the size of your book, you’d need to cut the foam to match the book cover & then measure it so you can repeat it for all the books.
6- ADD THE STICKER (BOOK COVER PICTURE) TO THE FOAM:
Take your book covers and make one book at a time, peeling off the back of the sticker and placing the sticker on the foam. Repeat on the back of the book with the duplicate cover.

7- PUT THE BOOKS INTO THE ORNAMENT:
Put the books into the ornament & either close it (if you picked the ornament that opens in the middle) or close up the top if you picked the standard bauble.
8- GLUE THE ORNAMENT SHUT:
When you are done adding books, glue the ornament shut.
8- ADD RIBBON TO HANG IT:
You will need to add a slice of ribbon to the top of the ornament so it can hang on the tree.
9- ADD THE YEAR OR PERSONALIZE IT:
This is optional, but I love to date all of my ornaments. You can include the year by writing it on the ornament with a sharpie or vinyl sticker.
Frequently Asked Questions for Year of Book Ornament:
There are a lot of questions that go along with these books, but remember that there are multiple ways to make them. I suggest trying out the foam mounting tape method (picture printed on regular paper, then stuck onto foam mounting tape) if this is your first time making it. It’s much quicker & easier. 🙂
Below are some questions with answers that I hope you’ll find helpful.
WHAT SIZE SHOULD I MAKE THE IMAGES OF THE BOOK COVERS?
- If you paste your book covers into a blank Google Doc, set each image width to 0.8”. That will automatically size the length to 1.2,” and you’ll have the perfect dimensions for a miniature book.
- If you use a Word Doc. or Excel, size each image to 1.2 X 8.
HOW CAN I BRIGHTEN THE IMAGES?
Here are some ideas to brighten your images:
- Use the library printer or professional printer at a store.
- Edit the contrast on the document. Make it brighter than you think looks good on the screen. Test a page & adjust it until you get it right.
- Print it on coated paper instead of uncoated paper since the uncoated paper can soak up the ink.
- Lighten your pictures by about 25%. It may look faded on the screen, but it will print better if you print it at home.
WHAT PHOTO DO I USE FOR THE BACK?
Use the same photo for the front AND back, so you can see the book cover no matter which way the book is facing in the ornament.
HOW MANY BOOKS WILL FIT IN THE ORNAMENT?
This ornament has 78 books, but you can easily fit over 100. The ornaments range in size, so pick the size accordingly. Ornaments range in size from 2″ – 4″.
GET THE (FREE) BLANK BOOK COVER TEMPLATE BY CLICKING HERE. Next, make a copy of the Google Document to begin editing.
MORE TIPS:
Geri Hubbard suggested leaving a small space between the matching book covers so she could easily fold them over instead of cutting them apart. She also shared her Word settings.
Other Gift Ideas:
Best Book Posts:
- 5 Chapter Books to Read to Elementary School Kids
- Inspirational Books for Teenagers
- Chapter Books for Kids Who Love Dogs

This miniature book ornament was created & shared by Sarah Gleaton Deaner.


Oh my gosh this is adorable! This is such a great idea! This would be a great gift idea for your fellow friends who are book nerds!
I want to do this
These directions are so helpful!