This post may contain affiliate links. Please read our disclosure policy.
Haircuts for boys:
If you are new here, you can keep up with Your Modern Family! Get tips sent to you daily: FOLLOW via RSS, FOllOW by EMAIL or on Facebook and Find me on Pinterest
If you are looking for a better way to do a haircut for a boy, do it yourself! We were paying $25 per child per haircut every 6 weeks. This was a lot to spend every 6 weeks and and I didn’t even like the way that it was cut.
My solution: I bought a good set of clippers (a whole set) & had my husband watch a few videos on youtube about “cutting your child’s hair” & now he does it. He is awesome! It looks so much better than they did because he knows their hair type. He knows where they have hair that stands up & where they have thicker/thinner parts, so it work out so much better. He can cut it every four weeks now, if we need a little trim. Plus, its at home so they can hop right in the shower afterwards.
What do we need?
A barstool – this is great because it makes them easier to reach. We even put a booster seat on our barstool to give them an extra boost.
Clipper Set (we got ours on sale at Kohls)
Cutting Shears (I think these were about $5 at Wal-mart)
Comb
Spray Bottle with water
Towel to wrap around them
Something to keep them entertained: TV, Movie, Tablet... How do we keep them still? We set up my laptop on a little table in front of them and we put on a movie. We do this in the garage because I don’t want that mess in my house! 🙂
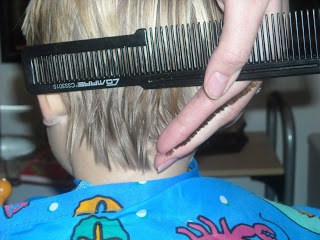
If you are just starting out, here are a few tips to help you… (picture source: heavelyhomemakers):
Start at the top of their hair. Get it wet (use a spray bottle or wet comb) & cut at a 45 degree angle. Hold your hand in the shape of their head. Cut along your fingers.
Hold the hair down firmly & cut a straight line across the bottom. (Get at eye level to double check it)
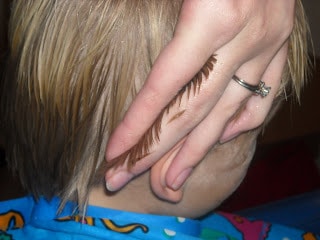
Still holding fingers with the shape of their head, start to move around the head. Move from the bottom to top.
Be sure that you push the ear down and cut around the ear, leaving a little side-burn.
Once the back area is finished, you can move up to the sides. You will continue with the 45-degree angle.
When you are making a cut, be sure to have some of the hair from the previous cut in your fingers to serve as a guide to how short you want it. (shortest hairs are the guide)
For the top: Take the hair from the center of the top of the head, lift it up, and cut it straight across.
When you have finished, just check to make sure it’s even. To do this, pull up pieces of hair and compare them (like you do when you are cutting, in between your fingers). Fix any spots, but don’t try to over-correct!
Remember in 4 weeks, you can do it all over again! It will not be perfect the first, second or third time, but within a few months, you will have this haircut-thing down pat! 😉


