This post may contain affiliate links. Please read our disclosure policy.
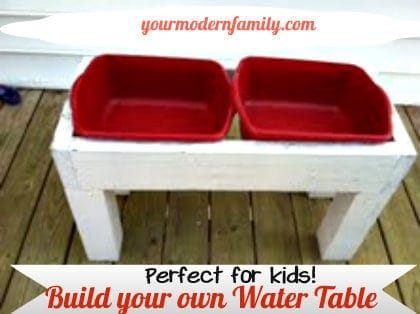
If you have kids, you know how they love to play in water! Our kids could play with water all day, so I wanted them to have a water table. My husband can build just about anything, so I told him that I wanted a water table and within a few days, the kids had a great wooden water table that has lasted four years, so far! You could also add sand to one side to make it a sand and water table.
Are you ready… DIY water table or sand table (or both!):
What you need:
2 x 6 x 8 size piece of pressure treated wood
4 X 4 X 6 size piece of pressure treated wood
Exterior Wood Screws (2 1/2 – 3 inches)
OPTIONAL: Wood Filler and Paint- whatever color you want it to be. You could stencil on their name or make it as fancy or plain as you want it to be.
What to do:
Step 1- Cut (or you could have the hardware store cut it for you): the 4 X 4 X 6 piece of wood into 14 inch sections.
You will need FOUR of these!
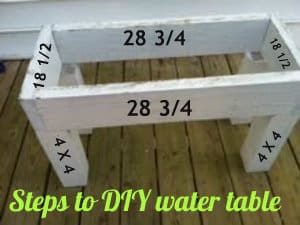
Step 2- Cut the 2 X 6 X 8 piece into the following lengths:
Cut two sections at 28 3/4 inches
Cut two sections at 18 1/2 inches (so you will have 4 total, but 2 one length and 2 another length)
Step 3- Make a rectangular box using the four cut pieces of 2 X 6 X 8
TIP: Pre-drill the holes for the screws so that the wood does not split.
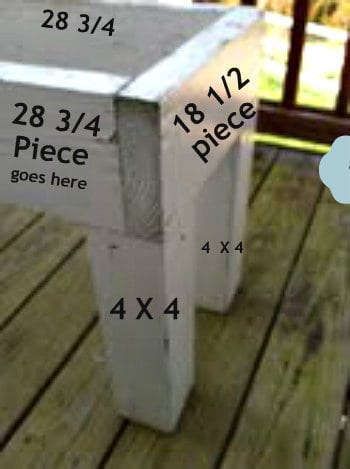
Step 4- Align the 4 X 4 legs in a rectangle and set the 2 X 6 frame on top.
AGAIN- Pre-drill the holes for the screws at an angle in the 4 X 4 tops facing up at an angle. You are angling it because it needs to screw into the legs. Secure the rectangular frame to the legs.
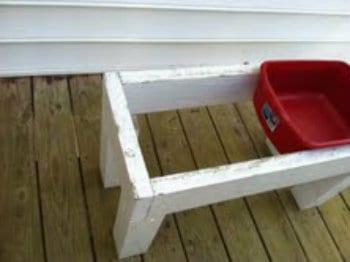
Step 5 is optional- Use wood filler where your holes and screws are to cover it. Sand it and then paint it.
I bought our containers at Wal-mart, but you can get them anywhere. I have red ones and clear ones. (The ones that I have now – for the picture- were $1.50 each at Walmart). I keep our table outside all year long, so I do have to replace the containers about once a year, maybe twice a year, because when it gets cold outside, they tend to crack (the water becomes ice and breaks the containers).
This table is easy to make and I have even had my husband make one for a gift for our friend’s daughter for her birthday a few years ago. My Dad took a look at ours and he made one for my nephew for his birthday, too. You can stencil the birthday child’s name on them for a personalized gift!
BONUS: If you wanted to bring it inside, it is small, so you could have it inside and fill it with anything else that you wanted to make a sensory table.
TIP: You can make it taller or smaller, based on what works for you. We have four kids and so far this table has been a hit with everyone that has played with it! I keep it on our deck outside and fill it up in the morning. They love it! Throw in some measuring cups, boats, medicine syringes… and you have hours worth of play! Our kids even use it with water blasters and the squirt toys- it makes it easy for them to re-fill their toys all by themselves.


Great idea!
Thanks! 🙂 We love it!
Your version of the Murphy bed is just what we will need in our new home to allow us use of the space when we don’t have overnight company.
Thank you for sharing with us.